• Thanks for visiting The Penturners Forum today.

    There are many features and resources that currently you are unable to see or access, either because you're not yet registered, or if you're already registered, because you're not logged in.

    To gain full access to the forum, please log in or register now. Registration is completely free, it only takes a few seconds, and you can join our well established community of like-minded pen makers.

Preparing my roman harvest kit

Penpal

Grand Master
Joined
May 26, 2013
Posts
25,342
Location
Canberra AUSTRALIA
First Name
Peter
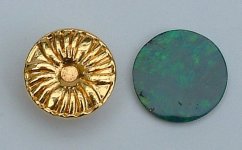
My desire was to modify the button gold top by replacing it with an Opal mined and cut by my mate of 60 yrs where he is still actively mining 40 ft underground.

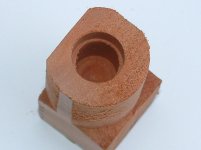
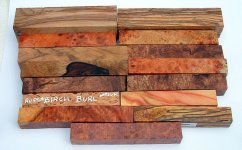
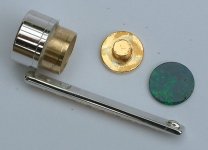
First step was to turn a simple hole recessed into a piece of Red Gum Blank a small clearance for the button to drop in then turn to a slip fit for the reversed top of the pen, using a flat punch tap tap out popped the gold rivet shaped button.

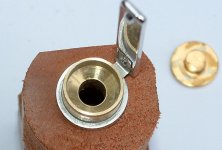
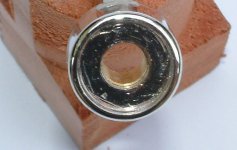
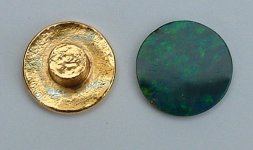
Top of the pen with gold button removed.

KIt Bag.

Peter.
 

Attachments

  • DSCF0021.JPG
    DSCF0021.JPG
    64.8 KB · Views: 71
  • DSCF0014.JPG
    DSCF0014.JPG
    78.3 KB · Views: 70
  • DSCF0012.JPG
    DSCF0012.JPG
    75.9 KB · Views: 70
  • DSCF0022.JPG
    DSCF0022.JPG
    43.9 KB · Views: 70

Penpal

Grand Master
Joined
May 26, 2013
Posts
25,342
Location
Canberra AUSTRALIA
First Name
Peter
Next step

Using the old gold button top to size the Opal replacement.

Second pic shows the shape of the gold button is like a rivet underneath was pressed into the hole in the top in manufacture.

Peter.
 

Attachments

  • DSCF0007.JPG
    DSCF0007.JPG
    54.5 KB · Views: 70
  • DSCF0010.JPG
    DSCF0010.JPG
    53.7 KB · Views: 70

Penpal

Grand Master
Joined
May 26, 2013
Posts
25,342
Location
Canberra AUSTRALIA
First Name
Peter
Step three

Step 3.

The short brass is pressed onto the top next to the clip when the blank is chosen and turned pic shows the blank choice to be made.

Peter.
 

Attachments

  • DSCF0025.JPG
    DSCF0025.JPG
    65.8 KB · Views: 70
  • DSCF0028.JPG
    DSCF0028.JPG
    104.7 KB · Views: 70

rowdyyates115

It's Showtime.....
Registered
Joined
Jun 22, 2013
Posts
2,155
Location
Portsmouth, UK
Pete, not as good as yours.
I was getting cheesed off with the black dot on the end of JR's.
Done a couple with the leftovers of my old castings - just to be different. It does make a difference...
No photos as yet - sorry...

But yes, Pete I luv it....:love_it::love_it:
 
Last edited:

Penpal

Grand Master
Joined
May 26, 2013
Posts
25,342
Location
Canberra AUSTRALIA
First Name
Peter
Important steps

Selecting and exact measurement of drills I have for the top blank and the lower blank.

ABSOLUTE CAUTION since I have chosen an Aussie Opal top I will fit the OPAL TOP ONLY AFTER PRESSING THE TOP TO THE BRASS AND THE JOINER PIECE>

Kind regards Peter.
 

Attachments

  • DSCF0031.JPG
    DSCF0031.JPG
    133.5 KB · Views: 70
  • DSCF0017.JPG
    DSCF0017.JPG
    69.4 KB · Views: 70

Penpal

Grand Master
Joined
May 26, 2013
Posts
25,342
Location
Canberra AUSTRALIA
First Name
Peter
Pete, not as good as yours.
I was getting cheesed off with the black dot on the end of JR's.
Done a couple with the leftovers of my old castings - just to be different. It does make a difference...
No photos as yet - sorry...

But yes, Pete I luv it....:love_it::love_it:

Just joking mate it takes time to drop in pics for me.:nopic:

Kind regards Peter.
 

Penpal

Grand Master
Joined
May 26, 2013
Posts
25,342
Location
Canberra AUSTRALIA
First Name
Peter
Rowdy I reckon it is just wonderfull thanks for showing mate its worth the effort and after a while easy to replicate.

Kind regards Peter.:thumbs:
 

Jimjam66

Chief Battonager
Registered
Joined
Jan 27, 2013
Posts
3,775
Location
Basingstoke, Hampshire
Too job, both Peter and Rowdy. Rowdy, you're an old man mate - you should be sleeping at that time of night! :tongue:

I'll try to take a pic of my 'knock out block' later. Nowhere near as posh as yours Peter, but it does the job. As you say, the first one is a pain but after that they get easier.
 

Grump

Grand Master
Joined
Aug 17, 2013
Posts
10,504
Location
Stevenage
First Name
Brian
I have never needed a knock out block, press it into tube, usually while assembling the finished pen.
Discover you have forgot the clip or have left some ca on the end that now looks like a pile of poo sicking out the side.
Hold cap in one hand insert transfer punch and whack with rubber mallet in the other hand, button pops out on floor.
Unless you have pre thought and laid some newspaper on bench ready.
Whack a second time to remove finial, spend next hour looking for all the parts in the shavings pile, throw in bin start again init?
 

paulm

grave manibus faciendum
Registered
Joined
Oct 7, 2013
Posts
12,046
Location
Sandford
First Name
Paul
Wow, I never thought of adapting and existing top, I've only ever considered making a new one and therefore haven't got round to it yet. Thanks Pete and Rowdy, this is excellent stuff.

:thumbs:
 
Warning! This thread has not had any replies for over a year. You are welcome to post a reply here, but it might be better to start a new thread (and maybe include a link to this one if you need to).
Top