• Thanks for visiting The Penturners Forum today.

    There are many features and resources that currently you are unable to see or access, either because you're not yet registered, or if you're already registered, because you're not logged in.

    To gain full access to the forum, please log in or register now. Registration is completely free, it only takes a few seconds, and you can join our well established community of like-minded pen makers.

Made in Wensleydale (but not from cheese!)

Bob Ellis

Graduate Member
Joined
Dec 28, 2014
Posts
450
Location
Wensleydale, North Yorkshire
First Name
Bob
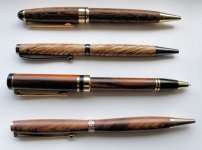
Here is the photo I said I would post in my New Starters thread showing some of the pens I have made.
PC290001.JPG

The top one is a European Round Top ballpoint pen turned from Goncalo Alves with gold plated trim. The surface looks uneven in the photo, but that is an optical illusion caused by the figuration; the pen is completely smooth.

The second is a Slimline ballpoint pen turned from American Oak Dymondwood with gunmetal trim.

The third is an American Flat Top pencil turned from Cocobolo with gold and black trim.

The bottom one is a Slimline ballpoint pen turned from Stabilised Redwood Burr with gold trim and a Greek centre band.

While I am fairly pleased with what I have achieved so far, I must look at ways of achieving a glossier finish.
 

Grump

Grand Master
Joined
Aug 17, 2013
Posts
10,504
Location
Stevenage
First Name
Brian
Not keen on the the 3rd one the pencil, but that's the kit not your turning.
Top one looks like it's bent but as you say could be the figuring in it.
They all look nicely turned and well fitted and presented well, goodly pic.
 

paulm

grave manibus faciendum
Registered
Joined
Oct 7, 2013
Posts
12,046
Location
Sandford
First Name
Paul
All of them nicely turned and finished with some lovely wood. Like Brian, I'm not keen on the kit of the pencil but it would probably look better in hand.
 

Buckeye

ペンメーカー
Executive Member
Joined
Oct 15, 2013
Posts
9,697
Location
UK
First Name
Peter
They all look good, but there is some lens distortion going on which is most notable with the top and bottom pens. If you want a glossy finish then it has to be CA, if you haven't done a CA finish before have a look at this and give it a whirl, you will find your own regime, but this works perfectly.

https://www.youtube.com/watch?v=-l6lz6af62I


Peter
 

Bob Ellis

Graduate Member
Joined
Dec 28, 2014
Posts
450
Location
Wensleydale, North Yorkshire
First Name
Bob
The top one and the bottom one both look bent in the photo, but I think that is a parallax effect from the camera (I am not a very skilled photographer!) The pens are not bent in reality.

As to the look of the American style pencil, it is not to everybody's taste, but I like that style.
 

Jim

Grand Master
Joined
Oct 19, 2011
Posts
15,617
Well done Bob, good looking pens, sadly i also don't like the pencil kit, it doesn't look right as the clip end looks over sized? Nothing at all wrong with the turning, or the wood used .. :thumbs:
 

Walter

Moderator
Fellow
Joined
Apr 22, 2013
Posts
2,698
Location
Amble on the sunny Northumberland coast.
First Name
Walter
Nicely made and finished pens.

The problem with flat top pencils (and ballpoints) is that (in my opinion) the barrel is too thin and not in proportion to the cap. This is a design issue and nothing to do with your turning. I used to modify these by making the top end of the barrel the same diameter as the cap centre band with a step to fit inside the cap. I have not made a flat-top kit for ages.

The curved appearance of the top pen is nothing to do with the grain pattern but, as Peter says, due to lens distortion and easily corrected using Lightroom or other photo editing software as I have done here although this does introduce some other distortions. A better result could be achieved by taking the shot from further away (or zooming out if using a zoom lens) and then cropping thus avoiding the distortion in the first place:

PC290001-2.jpg
 

Buckeye

ペンメーカー
Executive Member
Joined
Oct 15, 2013
Posts
9,697
Location
UK
First Name
Peter
The top one and the bottom one both look bent in the photo, but I think that is a parallax effect from the camera (I am not a very skilled photographer!) The pens are not bent in reality.

It's nothing to do with parallax, that is simple distortion.

Peter
 

Buckeye

ペンメーカー
Executive Member
Joined
Oct 15, 2013
Posts
9,697
Location
UK
First Name
Peter
Nicely made and finished pens.

The problem with flat top pencils (and ballpoints) is that (in my opinion) the barrel is too thin and not in proportion to the cap. This is a design issue and nothing to do with your turning. I used to modify these by making the top end of the barrel the same diameter as the cap centre band with a step to fit inside the cap. I have not made a flat-top kit for ages.

The curved appearance of the top pen is nothing to do with the grain pattern but, as Peter says, due to lens distortion and easily corrected using Lightroom or other photo editing software as I have done here although this does introduce some other distortions. A better result could be achieved by taking the shot from further away (or zooming out if using a zoom lens) and then cropping thus avoiding the distortion in the first place:

It is definitely not corrected Walter, but it is better than it was.

Peter
 

Buckeye

ペンメーカー
Executive Member
Joined
Oct 15, 2013
Posts
9,697
Location
UK
First Name
Peter
You certainly improved it:thumbs:

Peter
 

chas_41_uk

Registered
Joined
Mar 13, 2014
Posts
10,034
Location
Manchester
First Name
Chas
Ignoring the distortion in the photograph and the likes or dislikes of the kits :ave_it:
Some very well turned and finished pens there Bob :thumbs:
 

Bob Ellis

Graduate Member
Joined
Dec 28, 2014
Posts
450
Location
Wensleydale, North Yorkshire
First Name
Bob
Hi Peter: Thanks for sharing the video, which is clear and easy to follow. Just a couple of questions: when you have finished applying the CA and you are ready to buff the tubes to a high gloss finish, what method do you use? Does the application of the CA affect the smoothness of the finish and need sanding smooth with fine grit and micromesh? What do you recommend to buff the CA to a shiny finish? Do you apply a finishing coat of Hut wax or something similar or does the CA finish not need this type of protection?
 

stevenw1963

Bodger supreme
Fellow
Joined
May 9, 2013
Posts
3,551
Location
South Lanarkshire - Another tyke in exile
First Name
Steven
Some nicely turned pens Bob.

If you want a shiny finish on your pens, other than CA which stinks when applied, then go to Halfrauds or similar and buy a tin of acrylic lacquer, the stuff applied on paint on your car to make it shine. Sanding sealer on your pen then spray with lacquer, let dry, lightly sand and apply another coat. Let dry and off you go.
 

Penpal

Grand Master
Joined
May 26, 2013
Posts
25,342
Location
Canberra AUSTRALIA
First Name
Peter
At this stage liking your pens surfaces are variable but so are the different timbers. Pics have a way to go using streamline centre bands could save half the waste on the floor with Slimlines. If you name the camera it may have a close up setting that could eliminate the distortion going further back depends on the lens lots of consideration here. Too many ifs and maybees mate knock them over one by one with a little help from your friends. I see by your description you live in the UK no problem you are never too far from most assistance in a wood club or group surely a camera club, schools extra classes in photography a local studio could do with a pen for assistance quid quo pro? spelling? your local newspaper has a photographer. U tube is a great source of real help with finishing methods if at any time you feel isolated my mate in Tennant Creek travels to Alice Springs on a monthly basis for a meeting look that up on a map or Google this is real isolation mate.Thousands of kms on his annual holidays cause he wants to.

Not advocating big steps just pointing out not knowing makes it hard to know 1. Where you are? 2.What your working with. 3.Workshop and pic facilities basic facts to develop proceedures and practices that will assist you. If you were to say you lived on the most northern tip of Scotland thats isolatrion but I knew an expert who lived there and prospered as a craftsman, met him here for a week end seminar early in my turning, big help for me, blokes from the UK general and Ireland, France USA many and varied all with specialities and knowledge. Deciding which way to travel upwards sideways in experience down to you.

Kind regards Peter.:thumbs:
 

Buckeye

ペンメーカー
Executive Member
Joined
Oct 15, 2013
Posts
9,697
Location
UK
First Name
Peter
Hi Peter: Thanks for sharing the video, which is clear and easy to follow. Just a couple of questions: when you have finished applying the CA and you are ready to buff the tubes to a high gloss finish, what method do you use? Does the application of the CA affect the smoothness of the finish and need sanding smooth with fine grit and micromesh? What do you recommend to buff the CA to a shiny finish? Do you apply a finishing coat of Hut wax or something similar or does the CA finish not need this type of protection?

Hi Bob

The video is not mine it is David's from Timberbits, but it's his basic regime I follow, I use CA activator and I use Poundland CA although I have 20 bottles of Dan's CA in the wings. After applying the CA I then wet sand with micromesh using all the grits from 1200-12,000 the final polish I use Silvo a silver polish and it is an exteremly high gloss. Some people say not to bother with micromesh and to use a miracle new polish by all means try it and make your own mind up, but there is no shortcut to a high gloss finish with CA, not a proper one anyway:funny: Wax is not needed when you have achieved the high gloss.

Peter
 
Warning! This thread has not had any replies for over a year. You are welcome to post a reply here, but it might be better to start a new thread (and maybe include a link to this one if you need to).
Top