Thank you, I wasn't sure if ebonite would glue well to another material.
I did try 2 part epoxy on an acrylic sleeved cap i tried - it failed, possibly because it was a little thin and I had too adjust (redrill) the depth, but I also noticed the epoxy got warm and the acrylic let go from the wood. So I'm worried if I shape a wood sleeve close to the ebonite internals once it’s glued up would that generate enough heat to upset the epoxy again? or do you just take it really easy?
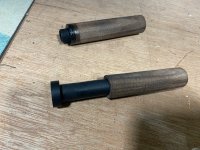
Yes you will be fine. Ebonite is used by a lot of pen makers for lining wooden pens, I’ve even done it myself but I don’t use it any more as I favour acrylic. But the principle is the same.
One thing you want to make sure is the gap between the liner and the sleeve isn’t too tight, meaning the glue has no room to settle, but also not too large to create cavities that won’t have the required integrity. Both these scenarios are prone to result in failure.
If you compare what you’re doing to kit pens it’s very similar although you don’t have the benefit of having the pre-sized brass tubes that are designed for specific drill sizes. So you need to work out what size insert works with what size wooden sleeve to give you a decent wall thickness for the wood and also fits snugly enough for the glue to work.
[Hint: look at a pen kit and the associated bushings (if you have them) and you could use that as a starting point for your own design dimensions…]