PensFromNo11
Full Member
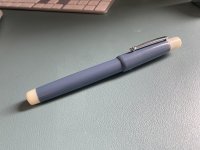
After being inspired by Dave (alpha1) and his great first kitless pen I’ve finally got around to doing my own. It wasn’t without incident, but I had the mindset from the start this IS a prototype.
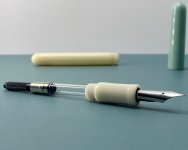
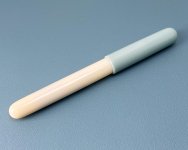
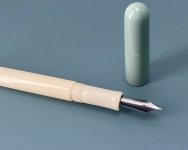
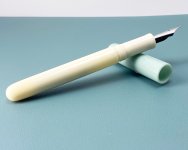
I chose materials in solid colours on purpose so I could see what was going on and a No6 Bock nib.
Armed with Dave’s experience, the invaluable comments and advice from Ash (ValleyBoy) and Phil’s “An intro to custom pen making” PDF, I made a plan.
I amassed the tools I didn’t have, I bought a couple of brass mandrills and made one for the cap out of a bit of acrylic.
This is definitely not a how too as I clearly haven’t the experience to impart that sort of information. This is my process first time out. I’m sure my processes will develop over time, but I think I show with a bit of thought anyone can do this.
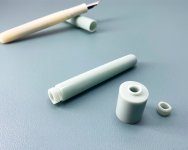
Cap (blank about 75mm)
Drilled 10mm hole about 60mm deep, then a 12mm hole 30mm and a couple of mm with a 14mm bit.
Used M13x0.8 triple start tap about 10mm inside the cap. Shaped & finished.
Body (blank about 100mm)
Drilled a 9mm hole 78mm deep and created a 10mm internal thread with a M10x1 tap
Made a 6mm tenon about 12.9mm thick (this is what I did wrong first time and the threads ended up around 12.4mm which made the cap too loose). I created the threads for the cap with M13x0.8 triple start die. Shaped & finished.
Section (blank about 30mm)
Drilled all the way through with 7mm bit. Drilled 7.3mm hole for the nib thread depth is critical so I checked and double checked. Drilled a 8.3mm hole for the body of the nib again depth was critical so checked many times. Drilled a little recess for the cap flange. Created the threads for the Bock nib with M7.9x0.6 tap. On the back of the section I created a 6mm tenon 9.7mm thick and created the threads for body connection. Shaped & finished.
What went right - I have a usable pen
What went wrong - I cut the cap thread on the body too shallow so it didn’t engage with the cap. I stupidly tried to hold the section (via a mandrill) on the finished thread for the body as I tried to make a little adjustment with a big drill bit and the thread said no. I wasn’t happy with the shape of the section, but that mostly because I couldn’t envisage how it would connect to the body.
What I leant - new processes, its not until you have made your first complete pen that you can work out the relationship between each part (body, cap & section) and just take your time and
I chose materials in solid colours on purpose so I could see what was going on and a No6 Bock nib.
Armed with Dave’s experience, the invaluable comments and advice from Ash (ValleyBoy) and Phil’s “An intro to custom pen making” PDF, I made a plan.
I amassed the tools I didn’t have, I bought a couple of brass mandrills and made one for the cap out of a bit of acrylic.
This is definitely not a how too as I clearly haven’t the experience to impart that sort of information. This is my process first time out. I’m sure my processes will develop over time, but I think I show with a bit of thought anyone can do this.
Cap (blank about 75mm)
Drilled 10mm hole about 60mm deep, then a 12mm hole 30mm and a couple of mm with a 14mm bit.
Used M13x0.8 triple start tap about 10mm inside the cap. Shaped & finished.
Body (blank about 100mm)
Drilled a 9mm hole 78mm deep and created a 10mm internal thread with a M10x1 tap
Made a 6mm tenon about 12.9mm thick (this is what I did wrong first time and the threads ended up around 12.4mm which made the cap too loose). I created the threads for the cap with M13x0.8 triple start die. Shaped & finished.
Section (blank about 30mm)
Drilled all the way through with 7mm bit. Drilled 7.3mm hole for the nib thread depth is critical so I checked and double checked. Drilled a 8.3mm hole for the body of the nib again depth was critical so checked many times. Drilled a little recess for the cap flange. Created the threads for the Bock nib with M7.9x0.6 tap. On the back of the section I created a 6mm tenon 9.7mm thick and created the threads for body connection. Shaped & finished.
What went right - I have a usable pen
What went wrong - I cut the cap thread on the body too shallow so it didn’t engage with the cap. I stupidly tried to hold the section (via a mandrill) on the finished thread for the body as I tried to make a little adjustment with a big drill bit and the thread said no. I wasn’t happy with the shape of the section, but that mostly because I couldn’t envisage how it would connect to the body.
What I leant - new processes, its not until you have made your first complete pen that you can work out the relationship between each part (body, cap & section) and just take your time and