• Thanks for visiting The Penturners Forum today.

    There are many features and resources that currently you are unable to see or access, either because you're not yet registered, or if you're already registered, because you're not logged in.

    To gain full access to the forum, please log in or register now. Registration is completely free, it only takes a few seconds, and you can join our well established community of like-minded pen makers.

My first 2 pens

Grasbylee

Full Member
Joined
Mar 7, 2017
Posts
121
Location
Lincolnshire
First Name
Lee
My final post for today - my first ever pens. One is box wood and the other is walnut.

I think I my have a new addiction :winking:

Comments, tips are all welcome

Cheers
Lee
 

Attachments

  • IMG_1120.jpg
    IMG_1120.jpg
    52.5 KB · Views: 61
  • IMG_1115.jpg
    IMG_1115.jpg
    71.8 KB · Views: 61

Vic Perrin

Moderator
Executive Member
Joined
Feb 23, 2014
Posts
8,215
Location
Rugeley Staffs
First Name
Vic
Can't really make out the detail Lee due to the background. Try taking the pics again on a plain white background so the detail of the pens can be seen :thinks:
 

fortress

Registered
Joined
Apr 11, 2016
Posts
5,178
Location
Astley
First Name
John
I was going to say exactly what Vic said about the background and not being able to see details. The question is Lee, are you happy with them? :thumbs:
 

Penpal

Grand Master
Joined
May 26, 2013
Posts
25,342
Location
Canberra AUSTRALIA
First Name
Peter
Neat pens Lee you must be relieved to have actually made them, taken pics of them and shown them to us. I do remember making my first pen and the questions and answers that came from it. Small detailing at the centre band can be improved by rolling the edge over a little to give you a better fit. How are you getting on square facing your blanks?

All round you have made two pens to be happy with. I like that you varied the backgrounds, always be on the lookout for interesting ones. I use a simple open box made of conduit to give an endless back ground using copy paper, a light either side and a top light not as strong as the other two.

By endless curving the background away from the pen does not show up in the pic.

WEll done mate most all of us would be happy to have achieved these two pens for a first.

Peter.
 

Attachments

  • My light open box.JPG
    My light open box.JPG
    118.3 KB · Views: 50

Bammer

Fellow
Joined
Oct 5, 2015
Posts
1,482
Location
Cambridge
First Name
Brad
Excellent first effort :thumbs:

I agree with the others regarding the background

and agree with penpal, more practice needed to get the fit right. Get yourself some calipers, measure the components against your finished pen where they meet.

Your on the slippery slope now ... onwards and upwards
 

Grasbylee

Full Member
Joined
Mar 7, 2017
Posts
121
Location
Lincolnshire
First Name
Lee
Vic - I will take note and do pictures with a white background. After checking out other pictures on here it really makes a difference
Cheers
Lee
:thumbs:
 

Bill Mooney

Blind old git
Grand Master
Joined
Aug 16, 2014
Posts
11,029
Location
County Durham
First Name
Bill
I can't see the detail for the background but they must be good from the above comments. Plain backgrounds are best. Plain white paper for dark or coloured pens & dark background for light/white pens.
 

Pierre

Graduate Member
Joined
Sep 2, 2015
Posts
999
Location
Southern Central France
First Name
Pierre
You have made exactly what I made when I started, and boy was I proud of them!! Then Walter made me a pen in exchange for some wood that I sent him, at that point I understood the level to achieve. So then I bettered it.(:winking: sorry Walter).... But I still use the pen he made me every day (despite it having gone through the washing machine 3 times now) WALTER whose mechanism was it? I need more, its still working (if a bit stiffly)!!

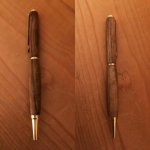
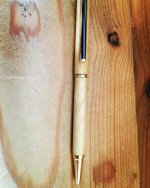
So as a critique, you have a made a couple of nice pens that you should be proud of, keep them as point of reference and the next ones should mate up precisely to the metal bits (ie there should be no discernible step from the wood to the metal).

The finish is important; if your photo can show you taking the photo before you apply a finish you will have made a perfect finish. I agree that's a slight exaggeration but when I finish my pens (and I suspect many others here have the same result) before I apply any polish, the wood or acrylic is shining (and they feel smoother than silk) . You should aim for a final sanding which is so good that applying either polish or ca merely seals the wood and makes the wood finish more permanent. I have now given up BLO/CA as a finish because my sanding sealer, Beal buffing system makes a much more tactile and aesthetically pleasing finish and people comment on it and buy seconds. Finishing normally occupies about 60% of the total manufacturing time of any wooden item if its done well.

Hope that helps

PG
 
Warning! This thread has not had any replies for over a year. You are welcome to post a reply here, but it might be better to start a new thread (and maybe include a link to this one if you need to).
Top