• Thanks for visiting The Penturners Forum today.

    There are many features and resources that currently you are unable to see or access, either because you're not yet registered, or if you're already registered, because you're not logged in.

    To gain full access to the forum, please log in or register now. Registration is completely free, it only takes a few seconds, and you can join our well established community of like-minded pen makers.

A weekend of utter faliure.

Pastor of Muppets

Full Member
Joined
Dec 5, 2017
Posts
279
Location
Oxford (ish)
First Name
Andy
Andy the idea of using a large disk to face blanks I find is the ability to use the outside for rapid removal and toward the centre for the last finish at the slower speed.

Peter.

Looks like I need to buy a new toy unless I can find a way to mount a table to the lathe
 

Pastor of Muppets

Full Member
Joined
Dec 5, 2017
Posts
279
Location
Oxford (ish)
First Name
Andy

Morse

Graduate Member
Joined
Dec 20, 2016
Posts
679
Location
Cheshire. UK
First Name
Dave
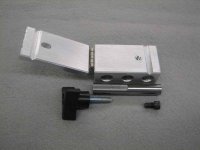
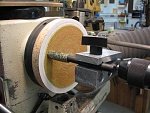
This was on the IAP website,
This tool allows you to OFFSET the blank, which allows you to use the WHOLE disc.

It has 3 different positions that allow you to move to a new spot whenever you want. The V-groove holds a transfer punch and the handle tightens everything down. To use it you just hold even downward pressure on the blank and push it into the disc...REAL simple!

If you don't want to use transfer punches you can put a regular pen mandrel in it and use your tube sleeves to take up the slack.

You can even use my Sanding Mill if you already have one of those.


You'll get the jig and a 1/2" steel bar that fits in your tailstock drill chuck. The steel bar has a flat spot milled in it which allows you to tighten the set screw securely.


The other three things you'll need are a disc, a set of transfer punches and a 1/2" drill chuck. If you purchased your lathe new it most likely came with a FACE PLATE which you can turn into the sanding disc, if not you can buy them just about anywhere for very little.
 

Attachments

  • 006.jpg
    006.jpg
    57.5 KB · Views: 33
  • a002.jpg
    a002.jpg
    12.1 KB · Views: 33

Pastor of Muppets

Full Member
Joined
Dec 5, 2017
Posts
279
Location
Oxford (ish)
First Name
Andy
This was on the IAP website,
This tool allows you to OFFSET the blank, which allows you to use the WHOLE disc.

It has 3 different positions that allow you to move to a new spot whenever you want. The V-groove holds a transfer punch and the handle tightens everything down. To use it you just hold even downward pressure on the blank and push it into the disc...REAL simple!

If you don't want to use transfer punches you can put a regular pen mandrel in it and use your tube sleeves to take up the slack.

You can even use my Sanding Mill if you already have one of those.


You'll get the jig and a 1/2" steel bar that fits in your tailstock drill chuck. The steel bar has a flat spot milled in it which allows you to tighten the set screw securely.


The other three things you'll need are a disc, a set of transfer punches and a 1/2" drill chuck. If you purchased your lathe new it most likely came with a FACE PLATE which you can turn into the sanding disc, if not you can buy them just about anywhere for very little.

That sir is exactly what I need!!

I don't suppose they mentioned where to get it from??
 

Pierre

Graduate Member
Joined
Sep 2, 2015
Posts
999
Location
Southern Central France
First Name
Pierre
You said you screwed the nut on the end of your mandrel then brought up the mandrel saver. I don’t think you need the nut, the mandrel should go inside saver right up against the bushes, otherwise the threaded part is slightly narrower than the mandrel shaft and you could be getting movement of the shaft inside the saver. That’s what I always used to do anyway.

What Ray says is important, with a mandrel saver you should not use the knurled nut, it must go over the solid part of the metal bar else you will get chatter especially with a carbide tool because you don't have as much bevel compressing and holding the wood in place.

I use a barrel trimmer all of the time and don't have the splitting problem, unless the blank itself has a hidden fissure.

The other element is when you turn, don't insert the cutting edge into the endgrain, instead cut from the middle to the ends, then you will avoid lifting the grain and forcing the split equally you will be compressing the fibres down and slicing them. (if you don't already)
 

Pastor of Muppets

Full Member
Joined
Dec 5, 2017
Posts
279
Location
Oxford (ish)
First Name
Andy
What Ray says is important, with a mandrel saver you should not use the knurled nut, it must go over the solid part of the metal bar else you will get chatter especially with a carbide tool because you don't have as much bevel compressing and holding the wood in place.

I use a barrel trimmer all of the time and don't have the splitting problem, unless the blank itself has a hidden fissure.

The other element is when you turn, don't insert the cutting edge into the endgrain, instead cut from the middle to the ends, then you will avoid lifting the grain and forcing the split equally you will be compressing the fibres down and slicing them. (if you don't already)

Thanks Pierre,
So in essence its best if both the head of the mandrel and the mandrel saver are touching the Bushes?
 

Bammer

Fellow
Joined
Oct 5, 2015
Posts
1,482
Location
Cambridge
First Name
Brad
Andy, here's a vid of how I square my blanks, believe me, it's a lot easier when you don't have to hold a phone as well ... :funny:


Bill Mooney

Blind old git
Grand Master
Joined
Aug 16, 2014
Posts
11,032
Location
County Durham
First Name
Bill
A lot of good advice given above.
You say you thought about using your/arm saw, this would square to the edge of your blank not the tube. This is why you put your blank on a shaft whether it be a trimmer or transfer punch & sanding disc.
When you glue your tube in make sure your twist them in with at least one full rotation to evenly spread the glue so all the timber is covered.
When I do cross cut or burr blanks I come in from the ends so as not to break the timber away from the ends which can happen when you cut towards the bushes.
Like Ray I don’t use the nut when using the mandrel saver, it’s not necessary.
As has already been said, make sure you’re trimming down to the tube so timber & tube are flush.
 

Pastor of Muppets

Full Member
Joined
Dec 5, 2017
Posts
279
Location
Oxford (ish)
First Name
Andy
A lot of good advice given above.
You say you thought about using your/arm saw, this would square to the edge of your blank not the tube. This is why you put your blank on a shaft whether it be a trimmer or transfer punch & sanding disc.
When you glue your tube in make sure your twist them in with at least one full rotation to evenly spread the glue so all the timber is covered.
When I do cross cut or burr blanks I come in from the ends so as not to break the timber away from the ends which can happen when you cut towards the bushes.
Like Ray I don’t use the nut when using the mandrel saver, it’s not necessary.
As has already been said, make sure you’re trimming down to the tube so timber & tube are flush.

Thanks Bill,

Ive ordered the offset sander from Rick On IAP and i have a couple of face plates at the shop so ill fire up a sanding disk too.
I always worry how good the glue coverage is inside of the blank especially when there is a snug fit. if it is snug is CA glue a better choice than foamy G glue?
no using the knurled nut and make sure i sand down the tube a little too
 

Phil Dart

Moderator
Executive Member
Joined
Nov 28, 2014
Posts
5,458
Location
Colebrooke, Devon
First Name
Phil
If you're worried about glue coverage, have a read of this.

Preventing pen tubes from moving with Gorilla Glue | Beaufort Ink

I wrote it in regard to stopping the glue expansion from pushing out the tube, but the same method also ensures even coverage, which apart from all the advice aboce about trimming, is probably the other main reason why your blanks are failing.
 

Pastor of Muppets

Full Member
Joined
Dec 5, 2017
Posts
279
Location
Oxford (ish)
First Name
Andy

Penpal

Grand Master
Joined
May 26, 2013
Posts
25,342
Location
Canberra AUSTRALIA
First Name
Peter
I coat the inside of the blank the outside of the brass have never dampened,use a plug of potatoe in end of the brass. I still use a rubber band or two end ways to be sure to be sure. I intend to use a little water in the blank before hand. I have never lost a blank on the lathe except the odd plastic one, the makers of plastic get careless with the mix from some sources.A mate of mine had a whole batch of printed circuit boards from a big dealer who scoffed off the problem with no return for twenty double blanks.

Peter.
 

Pastor of Muppets

Full Member
Joined
Dec 5, 2017
Posts
279
Location
Oxford (ish)
First Name
Andy
I coat the inside of the blank the outside of the brass have never dampened,use a plug of potatoe in end of the brass. I still use a rubber band or two end ways to be sure to be sure. I intend to use a little water in the blank before hand. I have never lost a blank on the lathe except the odd plastic one, the makers of plastic get careless with the mix from some sources.A mate of mine had a whole batch of printed circuit boards from a big dealer who scoffed off the problem with no return for twenty double blanks.

Peter.

Ouch that's bad form on their part!

What do you use to coat the inside of the blank?
 
Warning! This thread has not had any replies for over a year. You are welcome to post a reply here, but it might be better to start a new thread (and maybe include a link to this one if you need to).
Top