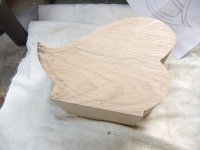
Just been asked to make some bandsaw boxes, so I have made a start today. both of them are cut out as in the last photo next job to cut the draw units before spending ages sanding all the parts ready for reassembly
-
Thanks for visiting The Penturners Forum today.
There are many features and resources that currently you are unable to see or access, either because you're not yet registered, or if you're already registered, because you're not logged in.
To gain full access to the forum, please log in or register now. Registration is completely free, it only takes a few seconds, and you can join our well established community of like-minded pen makers.
You are using an out of date browser. It may not display this or other websites correctly.
You should upgrade or use an alternative browser.
You should upgrade or use an alternative browser.
Bandsaw boxes mini WIP
- Thread starter Dalboy
- Start date

Can’t wait Derek.
I really like these. been wanting to try to make one myself ... like i have the time,Just been asked to make some bandsaw boxes, so I have made a start today. both of them are cut out as in the last photo next job to cut the draw units before spending ages sanding all the parts ready for reassembly
Is there a decent book you could recommend for a beginner, kids keep asking what I want for Christmas so this could be it.
Cheers
Brad
Looking forward to the finished article Derek
I don't use books for these but they are fairly simple to do as long as you cut them in the correct order.I really like these. been wanting to try to make one myself ... like i have the time,
Is there a decent book you could recommend for a beginner, kids keep asking what I want for Christmas so this could be it.
Cheers
Brad
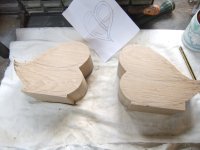
I first draw the shape remembering how large the draws need to be on some paper. I then prepare the wood and as most of the boxes I have made are 4" thick I use two 2" thick and plane them so that they are flat for gluing together. I then plane three sides the back,front and bottom the others will be cut away so don't bother with them.
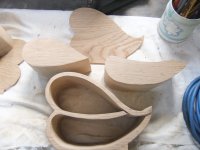
The outside shape is cut making sure you have a good size base followed by cutting the back off normally about 1/4" thick and clean these faces as they will be glued together later.
Now cut out the draw shapes paying attention to where the entry cut lines to each draw are going to be located.
The next job is the worst part and that is sanding the internal draw openings before the back is reattached with glue followed by sanding the outside.
I will show some more photos as I progress on this project. As you can see this is where I am at the moment will add more as I cut the draws
alan morrison
Fellow
Derek, what do you use to lift the drawers making the gap around the body even?
I attack some thin strips of wood onto the bottom of the draw which keeps them centred. I will be adding photos when I get to that stage.Derek, what do you use to lift the drawers making the gap around the body even?
Anyway on to todays work on them.
Photo one shows how I cut into the block which makes it easy to re-glue.

These are the two draw blanks yet to be cut into the draws

The back panel has been cut to a more flowing shape at the bottom making the foot sit back a little

Using the back panel I marked the front which will need cutting out. I placed the draw blanks in and as can be seen the grain all lines up

The first of the glue up where the cut were made to do the draws this makes the casing more ridge. You can also see where I undercut the foot area this was done with a small saw and some sandpaper. The cut outs were sanded before the glue up. I have not done much sanding to the outside that will be done when I glue the back on otherwise you could accidentally round over the back edge which will stand out like a sore thumb.
Depending on the shape that is chosen it can be fun clamping the piece

Penpal
Grand Master
Enjoyed your progress posting mate love the results.
Before I glued the backs on I sanded all of the draw cut outs as it is easier to do so from both sides. The backs are glued in place and you will notice that even though they are cut from the back that there will be a small overlap left this is taken care of when the outside is sanded

With all of the outside except the front all sanded to 240grit


This photo shows the difference cutting the foot area back as can be seen on the left compared to the right which still needs this doing

Just a quick shot of them both the draws for the one on the right are ready for cutting to make the draw which will be tomorrows job

With all of the outside except the front all sanded to 240grit
This photo shows the difference cutting the foot area back as can be seen on the left compared to the right which still needs this doing
Just a quick shot of them both the draws for the one on the right are ready for cutting to make the draw which will be tomorrows job
Thanks for the heads up Derek.
Spent the first part of today cutting the undercut to add shape to the bottom of the heart shape( a small note not all bandsawn boxes need this doing it depends on the shape and design) then sanding the main cases ready for finish to be applied, no pictures of this.
The draw blocks are the next things to be attacked with the bandsaw by cutting a slice off of the front and back

This was followed by cutting the inner portion to form the draws, I did place these in the cases and stood them up to mark the bottom of the cut this makes sure they are level with the bottom base as well as to see how much I can take out. These two pieces are the waste cut out of one set of draws. OK I forgot to take pictures of these before gluing

The two draws glued and in clamp I did wipe the excess glue after the picture was taken


I may get more done later as tea break is now taking place even if I am now officially retired as of the 8th this month
The draw blocks are the next things to be attacked with the bandsaw by cutting a slice off of the front and back
This was followed by cutting the inner portion to form the draws, I did place these in the cases and stood them up to mark the bottom of the cut this makes sure they are level with the bottom base as well as to see how much I can take out. These two pieces are the waste cut out of one set of draws. OK I forgot to take pictures of these before gluing
The two draws glued and in clamp I did wipe the excess glue after the picture was taken
I may get more done later as tea break is now taking place even if I am now officially retired as of the 8th this month
Penpal
Grand Master
Hi mateyou added importance to the finished p5roduct to even the inevitable gaps,well done.
@alan morrison You can now see the wooden strips which are glued to the bottom of the draws to help centralize them
First and second picture the strips in place ready for cutting to length and glueing to the bottom of the draws this is just a dry run to get them in the correct place. You will also see the handles are now also in place made from American Black Walnut


The top draw needed a little more sanding on the right to even up the gap so that I had a reasonable sized gap all of the way around before I glued the strips in place

Cut and glued and when dry a small hand plane as some were just a bit too thick near the back


Boxes are now on the bench after spending the day cleaning the workshop followed by a coat of sander sealer. Hopefully will get at least one coat of final finish on. If I get out early I may even get two coats on
First and second picture the strips in place ready for cutting to length and glueing to the bottom of the draws this is just a dry run to get them in the correct place. You will also see the handles are now also in place made from American Black Walnut
The top draw needed a little more sanding on the right to even up the gap so that I had a reasonable sized gap all of the way around before I glued the strips in place
Cut and glued and when dry a small hand plane as some were just a bit too thick near the back
Boxes are now on the bench after spending the day cleaning the workshop followed by a coat of sander sealer. Hopefully will get at least one coat of final finish on. If I get out early I may even get two coats on
alan morrison
Fellow
Very neat solution, Derek.
I really like your wee plane.
I really like your wee plane.
I find slightly over thick as you can take it down to suit.Very neat solution, Derek.
I really like your wee plane.
The little plane came from a kit with knives and a sander in which was something my dad left me. it did need a good sharpening but now is ideal for little jobs like this
Lovely job Derek.


