• Thanks for visiting The Penturners Forum today.

    There are many features and resources that currently you are unable to see or access, either because you're not yet registered, or if you're already registered, because you're not logged in.

    To gain full access to the forum, please log in or register now. Registration is completely free, it only takes a few seconds, and you can join our well established community of like-minded pen makers.

My first kit less pen

alpha1

Fellow
Joined
Mar 29, 2018
Posts
1,181
Location
middlesbrough
First Name
Dave
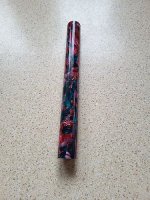
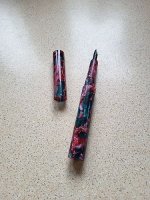
It wont win any beuty contests but it is my first attempt at a kitless pen. It was a bit of a challenge especialy the nib section. It needs a nib.
Its a size 5 Bock. I learnt a lot so it was worth while I will keep it I dont think it would sell. Some of the thread tollerences need more effort.
I will have another go now I have a better idea of how its done.
Needs a nib.jpg
Kitless pen.jpg
 

SorinS

Full Member
Joined
May 23, 2023
Posts
54
Location
Romania
First Name
Sorin
It wont win any beuty contests but it is my first attempt at a kitless pen. It was a bit of a challenge especialy the nib section. It needs a nib.
Its a size 5 Bock. I learnt a lot so it was worth while I will keep it I dont think it would sell. Some of the thread tollerences need more effort.
I will have another go now I have a better idea of how its done.
View attachment 50214
View attachment 50215
Don't sell it even if you get a request! :) It will remind you over the time about your first attempt and will be a reference for your future pens! Actually, it's quite nice! :)
 

PensFromNo11

Full Member
Joined
Jun 6, 2023
Posts
97
Location
Buckinghamshire
First Name
Darren
Great job Dave.
Don't sell it - once you are over the "I could take a hammer to you' phase no one will be prouder to own it than you.
And thank you for documenting your journey, it's been invaluable to a lot of us thinking of our first kitless foray.
 

alpha1

Fellow
Joined
Mar 29, 2018
Posts
1,181
Location
middlesbrough
First Name
Dave
Thank you for all your kind words.
If I have learnt one thing from this exercise it is if you are thinking of going down the kitless pen route and thinking of investing in a triple tap and die my advice is your first choice should be 13x0.8 to accommodate the Bock 6 nibs. Just my opinion but the choice is up to you. I think the Bock 6 dimensions are easier to work with. Its my Birthday to morrow I am 72 years young wondering if I can persuade them to buy me a set of 13x0.8 tap and die.
 

ValleyBoy

Graduate Member
Joined
Jul 9, 2019
Posts
665
Location
Cardiff
First Name
Ash
Well done! It’s a good feeling to finish the first pen.

I would keep this and, more importantly, use it. Put a nib in and fill it with ink. Thats how you’ll get to understand the changes you might want to make for the next one. You won’t nail every detail in the next one, nor the one after that, but you will form ideas on the ergonomics, aesthetics and the functionality of the pen. Irrespective of the cap thread sizes you use. For example you *may* find the nib dries out too fast (you probably won’t but you never know). In which case you may need to drill less into the cap to reduce the amount of air. Or you may find the nib interferes with the inside of the cap etc. etc.
My point is these early pens are the ones that you learn the most from so I’d encourage you to make the most of the opportunity.
Cheers
Ash
 

alpha1

Fellow
Joined
Mar 29, 2018
Posts
1,181
Location
middlesbrough
First Name
Dave
Well done! It’s a good feeling to finish the first pen.

I would keep this and, more importantly, use it. Put a nib in and fill it with ink. Thats how you’ll get to understand the changes you might want to make for the next one. You won’t nail every detail in the next one, nor the one after that, but you will form ideas on the ergonomics, aesthetics and the functionality of the pen. Irrespective of the cap thread sizes you use. For example you *may* find the nib dries out too fast (you probably won’t but you never know). In which case you may need to drill less into the cap to reduce the amount of air. Or you may find the nib interferes with the inside of the cap etc. etc.
My point is these early pens are the ones that you learn the most from so I’d encourage you to make the most of the opportunity.
Cheers
Ash
I took your advice and fitted a nib which imediatelly high lighted a problem I have not drilled the cap deep enough if I screwed the cap on it would bend the nib. Hmm also there is a problem with the section thread connecting to the pen body. They can be fixed but you were right. I can see how the issues can be corrected and avoided next time. Cheers.
 

ValleyBoy

Graduate Member
Joined
Jul 9, 2019
Posts
665
Location
Cardiff
First Name
Ash
I took your advice and fitted a nib which imediatelly high lighted a problem I have not drilled the cap deep enough if I screwed the cap on it would bend the nib. Hmm also there is a problem with the section thread connecting to the pen body. They can be fixed but you were right. I can see how the issues can be corrected and avoided next time. Cheers.
Take some comfort in the fact that you are not alone in this. I speak from experience.
I know it can be a little frustrating at first, especially when you spend so much time working on it. It seems like there’s always something that goes wrong and when you try to fix it then it impacts something else. I still have marks on my workshop wall where pieces of resin/pen hit it at very high speed…😂
However you’re obviously very close and once you get the mechanics figured out (internal diameters/depths and threads) then you can figure out the externals (length, size and shape).
There is always a stage during my pen making process where I have the cap and barrel drilled and threaded, and the section drilled, threaded and turned down to the correct diameter (but not shaped). Then I add the nib and converter and screw it together to make sure it assembles properly. So at this point it is, in theory, a working pen but it just looks like a blank when it’s screwed together. The shaping is the last thing I do.
I recommend you do the same so you don’t waste time shaping something that may end up being put aside due to issues. Also it’s easier to re-mount a component that is still effectively a blank (round and thick) if you need to re-drill it compared to a thinner piece that has been shaped already.
Also consider what I said about cutting things in half (lengthways) and having a good look inside. Maybe not with your first ever pen, but don’t be afraid to do it with other iterations. It will save you a ton of work I promise you. For example with your current issue of the nib hitting the cap you could take a blank, drill it out for the cap, (don’t bother threading it) and cut it down the middle. Then align the pen with the nib inserted against it to see if you have clearance (depth and width) and what changes you may need to make. You could do it with a piece of scrap wood for example. Then once you get it right keep that template for future reference as you may change something on your pen design and you can hold it against your template to see if it has any material affect. It’s a really useful visual guide.
Keep going!
Cheers
Ash
 

howsitwork?

Graduate Member
Joined
Sep 18, 2019
Posts
537
Location
north york (gods own county)
First Name
Ian
Thank you for all your kind words.
If I have learnt one thing from this exercise it is if you are thinking of going down the kitless pen route and thinking of investing in a triple tap and die my advice is your first choice should be 13x0.8 to accommodate the Bock 6 nibs. Just my opinion but the choice is up to you. I think the Bock 6 dimensions are easier to work with. Its my Birthday to morrow I am 72 years young wondering if I can persuade them to buy me a set of 13x0.8 tap and die.
shy bairns get nowt so ask !
 

SorinS

Full Member
Joined
May 23, 2023
Posts
54
Location
Romania
First Name
Sorin
I would add to @ValleyBoy 's comment, make all necessary drills or threading in a scrap piece of wood, just as a practice, then you just take that piece and split it longitudinal and see how everything fits inside, either is the section with the nib's unit, or the cap with the sleeve, or the body with the sleeve, and, consequently, the sleeves with the converter (for the body), or with the sleeves with the nib&section (for the cap. Check Youtube for exotic wood pens' channel, he has just such a video with split sleeves.
 

DuncSuss

Full Member
Joined
Mar 27, 2023
Posts
49
Location
Wilmington, MA
First Name
Duncan
I keep a few pieces of clear acrylic acetate around for prototypes. Being able to see clearances from the outside makes it much easier to get holes drilled deep enough taking small bites at a time and test-fitting as I go. If you do this, I recommend you buy cast rods, not extruded, even though it's more expensive there's less internal tension that can cause extruded rods to crack/distort when drilled and threaded.

Another thought - I find the dimensions of the JoWo #5 to be much easier to work with than the Bock #5 (which forces the section to be longer than I think looks "balanced" with the rest of the pen.) Of course it means buying another special purpose tap if you want to switch, but it's highly likely that at some point a customer will request a nib style/type that Bock don't make anyway. (It didn't take long before I had all four standard taps, JoWo #5 and #6 and Bock #5 and #6.)

You're off to a great start - looking forward to seeing your next one.
 

Lance

Full Member
Joined
Oct 6, 2019
Posts
17
Location
South wales
First Name
Lance
It wont win any beuty contests but it is my first attempt at a kitless pen. It was a bit of a challenge especialy the nib section. It needs a nib.
Its a size 5 Bock. I learnt a lot so it was worth while I will keep it I dont think it would sell. Some of the thread tollerences need more effort.
I will have another go now I have a better idea of how its done.
View attachment 50214
View attachment 50215
Great job well done
 

alpha1

Fellow
Joined
Mar 29, 2018
Posts
1,181
Location
middlesbrough
First Name
Dave
I am ready to have a go at another Kitless pen.
Things have moved on since my last effort. Most of my pen turning is done on a metal lathe. I have very little experience of using a wood lathe.
But that as changed I have joined a Wood Turners Club and all ready I have learned lots of usefull stuff on how to turn using a wood lathe.
Joining this Club has been a game changer. This one is going to be better I will post pictures.
 

PensFromNo11

Full Member
Joined
Jun 6, 2023
Posts
97
Location
Buckinghamshire
First Name
Darren
I am ready to have a go at another Kitless pen.
Things have moved on since my last effort. Most of my pen turning is done on a metal lathe. I have very little experience of using a wood lathe.
But that as changed I have joined a Wood Turners Club and all ready I have learned lots of usefull stuff on how to turn using a wood lathe.
Joining this Club has been a game changer. This one is going to be better I will post pictures.
Good luck, I'm currently on number 3 of my Kitless journey and (fingers crossed) it seems to be coming together.
I only have a wood lathe and have found a collet chuck invaluable.
 
Top