• Thanks for visiting The Penturners Forum today.

    There are many features and resources that currently you are unable to see or access, either because you're not yet registered, or if you're already registered, because you're not logged in.

    To gain full access to the forum, please log in or register now. Registration is completely free, it only takes a few seconds, and you can join our well established community of like-minded pen makers.

Ca coming away from pen

MarkNotts

Full Member
Joined
May 21, 2016
Posts
64
Location
nottingham
First Name
Mark
Like the title says and hopefully someone can mention a way of preventing this :(

The process was sanding 240 400 600 then celulose sanding sealer with thinner at about 50/50 mix

6x coats of thin ca
1x coat of medium ca

Micromesh ladded them the full range I think 1500 to 25000.

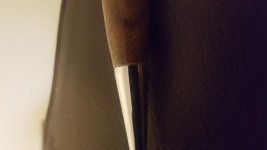
I put the pen together and was chiffed as Ive finally made a pen that i can call good enough for a workmates daughter but when I rapped up and got in the house to go to bed I noticed the ca coming off around the nib...

After sanding and sealing I swapped the bushings for metal cone bushings as I have had problems with ca sticking to the pen bushings then pulling ca off before, the ca was not stuck to these cones.

Im at the end of my tether and seriously close to giving up on wood pens and ca finishing and just going with acrylic pens instead! , the peeling is right at the end where it meets the nib.
 

Attachments

  • 14721247782331891995289.jpg
    14721247782331891995289.jpg
    18.8 KB · Views: 108

Penpal

Grand Master
Joined
May 26, 2013
Posts
25,342
Location
Canberra AUSTRALIA
First Name
Peter
Not too late to drift this part of the pen turn it down to the size of the top of the tip (it was overturned at this initial turning). Restore the finish and use a spacer lesser diameter than the top of the tip. Honour will be satisfied and the pen saved. Slight champhering would at this stage maybe take care of the furring and the fit., careful light CA then bobs your uncle.

From your detailed finishing technique after the 400 grit use the sanding sealer then the 600 grit etc . Do not give up timber is beautiful as well as acrylic.

Peter.
 

Buckeye

ペンメーカー
Executive Member
Joined
Oct 15, 2013
Posts
9,697
Location
UK
First Name
Peter
If you get CA on the ends of the blanks i.e. the end grain you will need to sand it back, if you don't when you assemble the pen you will get the nib pressing against the CA and that's what causes it to break away on the sides.

Peter
 

MarkNotts

Full Member
Joined
May 21, 2016
Posts
64
Location
nottingham
First Name
Mark
Not too late to drift this part of the pen turn it down to the size of the top of the tip (it was overturned at this initial turning). Restore the finish and use a spacer lesser diameter than the top of the tip. Honour will be satisfied and the pen saved. Slight champhering would at this stage maybe take care of the furring and the fit., careful light CA then bobs your uncle.

From your detailed finishing technique after the 400 grit use the sanding sealer then the 600 grit etc . Do not give up timber is beautiful as well as acrylic.

Peter.

Thanks for the detailed information mate :)
 

MarkNotts

Full Member
Joined
May 21, 2016
Posts
64
Location
nottingham
First Name
Mark
If you get CA on the ends of the blanks i.e. the end grain you will need to sand it back, if you don't when you assemble the pen you will get the nib pressing against the CA and that's what causes it to break away on the sides.

Peter

Thanks for the info, now you mention it some gunk was at the end and i tried to clean off as much as I could cutting inwards to center with a blade, how do you sand that rubbish off btw without damaging the ca around the rim or accidently putting a profile on the end ?

Bushings lead to sticking, cones lead to gunk :/
 

Buckeye

ペンメーカー
Executive Member
Joined
Oct 15, 2013
Posts
9,697
Location
UK
First Name
Peter
I use a faceplate sandpaper on in the headstock and a Jacobs chuck holding a transfer punch for the tube to slide on, if the transfer punch is the correct size you won't have any wobble of the blank as you touch it to the sandpaper, it leaves a nice flat end to the blank, square to the tube.

Peter
 

MarkNotts

Full Member
Joined
May 21, 2016
Posts
64
Location
nottingham
First Name
Mark
Thanks all Ive done it, i dont have time to try and take it apart so lucky i had another kit, I made another but half way through I had a lightbulb flash above my head...

Those cone bushings, I used them for the ca finishing and being careful and slow to rub from end to middle of the blank then the other end to the middle then a slight rub to blend the middle ca joins, then before wet sanding with the micromesh I put the original bushings back on and tightened as much as I dare, this worked to keep the ends clean as the crud doesnt fall down the cone to the brass tube and build up at the ends, after that a very light sand and no peeling.

The blank looks to fit a lot better at the nib also as I must have sanded a bit further down when dry sanding.

Thanks again and looks like pride has been saved as long as the ca does not decide to be an arse later in the night :/
 

fortress

Registered
Joined
Apr 11, 2016
Posts
5,178
Location
Astley
First Name
John
Hi Mark, when I apply ca with a paper towel I touch the middle first and then a quick left right, left right, left right.. Off. That's the way I do it, but others like yourself have their way. You can't beat a ca finish if it's done right IMHO. :winking:
 

Neil

Fellow
Joined
May 21, 2013
Posts
3,132
Location
Hitchin, Hertfordshire
First Name
Neil
I've literally made thousands of pens using ca and never had this issue other than a couple of times with cocobolo that I put down to poor adhesion with an oily wood and aggressive bush removing procedures. My technique is relatively agricultural but gives me a superb finish every time. Straight off the tools sand with the grain with 240, spin and clean with yellow nyweb and three coats only of ever build industrial superglue drizzled on to the cloth and pen simultaneously, with the grain at 400 to remove any small ridges and then through the micromesh and finish with a quick burnishing cream spin. Job done excellent every time!
 

Woody

Registered
Joined
Jul 12, 2013
Posts
12,812
Location
at home
First Name
no
Craftcoat is an excellent satin finish I tested it out when it was first introduced in the UK coated a pen with it then literally chucked it on me workbench among bits of corian and general workbench odds and sods and continued doing so for a few months and it still looked good after so I sold it
 

MarkNotts

Full Member
Joined
May 21, 2016
Posts
64
Location
nottingham
First Name
Mark
Craftcoat is an excellent satin finish I tested it out when it was first introduced in the UK coated a pen with it then literally chucked it on me workbench among bits of corian and general workbench odds and sods and continued doing so for a few months and it still looked good after so I sold it

Thanks woody Ive just watched a youtube vid about craft coat also and yeah it does look very good and quick to apply.
 
Warning! This thread has not had any replies for over a year. You are welcome to post a reply here, but it might be better to start a new thread (and maybe include a link to this one if you need to).
Top