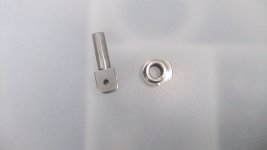
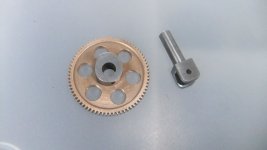
Some more work on the gear assembly. A support post and a cam for the larger of the two gears. And as a bonus a rubbish video of the gears turning difficult as I was trying to do this one handed as the other was holding the camera
-
Thanks for visiting The Penturners Forum today.
There are many features and resources that currently you are unable to see or access, either because you're not yet registered, or if you're already registered, because you're not logged in.
To gain full access to the forum, please log in or register now. Registration is completely free, it only takes a few seconds, and you can join our well established community of like-minded pen makers.
You are using an out of date browser. It may not display this or other websites correctly.
You should upgrade or use an alternative browser.
You should upgrade or use an alternative browser.
I am still in the workshop
- Thread starter Dalboy
- Start date
The governor parts pile has some more parts added to it all small parts but seem to take ages to do even if they are simple still some more to make. I have not yet soldered any parts as there are a few more that need hardening so will do the soldering and hardening all at the same time weather permitting as it is raining here.
The brass pins with the thread on the left are 1/8" diameter to give an indication of size the split pins that will be used on the silver steel pins are 1/32" to fit in the tiny holes
The brass pins with the thread on the left are 1/8" diameter to give an indication of size the split pins that will be used on the silver steel pins are 1/32" to fit in the tiny holes
Attachments
Hallelujahal
Graduate Member
Really enjoying this thread! I’m still yearning for a metal lathe 
It is a long project plenty to keep me going. Glad you are enjoying it. Like woodturning the pockets need to be deepReally enjoying this thread! I’m still yearning for a metal lathe
I have managed to do some more between having to buy and set up a new compter as well as getting the car passed a MOT.
Any way a few more parts some for the Govenor assembly and some for the exhaust valve assembly.
Govenor partts
.JPG")
Exhaust push rod assembly
.JPG")
.JPG")
The govenor assembly operates the exhaust assembly once all completed as well as the ignition system.
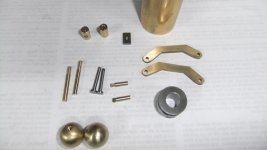
A general view of both assemblies some need to be silver soldere together I will ddo them in a batch that is why they are still in pieces to give an idea of sizze the two brass balls are 5/8" dianeter

The box is slowly filling up with parts this stops bits from going missing while working on other parts
.JPG")
Any way a few more parts some for the Govenor assembly and some for the exhaust valve assembly.
Govenor partts
Exhaust push rod assembly
The govenor assembly operates the exhaust assembly once all completed as well as the ignition system.
A general view of both assemblies some need to be silver soldere together I will ddo them in a batch that is why they are still in pieces to give an idea of sizze the two brass balls are 5/8" dianeter
The box is slowly filling up with parts this stops bits from going missing while working on other parts
Not done much but have now managed to complete the fuel mixer after having problems drilling a small #76 drilled hole through a 2/8" rod which can be seen in the second photo. The last one is of the assembled fuel. The main body is from 1/2" hexagonal bar. I also need to replace the grub screw as it is a little too long.
.jpg")
.jpg")
.jpg")
Adal6
Full Member
Derek. love your work. Brings back memories. Now i potter about with petrol mowers and chainsaws I still love it
Derek. love your work. Brings back memories. Now i potter about with petrol mowers and chainsaws I still love it
Thank you.
I had enough of chainsaws and mowers as I was a mechanic at a plant hire company. But it is still great when you solve a problem with them, and they are all working properly again
I’m loving following this Derek. Your skill set is superb.mate. Keep it going.
I have not updated for a while. I have been painting the main body and cylinder assembly.
Then onto the last part of the fuel mixer assembly is the elbow. Not having one, I thought I would have a go at making one which will give me the chance to do some silver soldering.
I started with 1/2" brass bar and turned the ends and centre section as needed, with a piece of steel made a quick and simple mandrel which I loctited on and clamped at a 45deg angle in the mill vice and notched out before heating to cherry red and bending to form the angle. I thought this was easier than cutting it into two parts and trying to keep it lined up while I soldered it.
The photos should help explain my method of making this.
.jpg")
.jpg")
.jpg")
.jpg")
.JPG")
Besides that I have been in the garden mainly on the veg patch and now started the flower beds. That is weather permitting
Then onto the last part of the fuel mixer assembly is the elbow. Not having one, I thought I would have a go at making one which will give me the chance to do some silver soldering.
I started with 1/2" brass bar and turned the ends and centre section as needed, with a piece of steel made a quick and simple mandrel which I loctited on and clamped at a 45deg angle in the mill vice and notched out before heating to cherry red and bending to form the angle. I thought this was easier than cutting it into two parts and trying to keep it lined up while I soldered it.
The photos should help explain my method of making this.
Besides that I have been in the garden mainly on the veg patch and now started the flower beds. That is weather permitting
Adal6
Full Member
Very fine work Derek spot on.
What with other jobs, not a lot of workshop time. But I have been able to apply some paint to the main body as well as get one of the flywheels set up for machining, more on that later when there is progress.
Anyway, the paint job it may not be everyone’s taste in colour.
It has got a top clear coat which is petrol resistant.

Anyway, the paint job it may not be everyone’s taste in colour.
It has got a top clear coat which is petrol resistant.
alan morrison
Fellow
Always means progress when the paint goes on.
Gadget-UK
Graduate Member
This is an amazing thread / story.
Keep with the updates Derek, I am so looking forward to the end result
Keep with the updates Derek, I am so looking forward to the end result