• Thanks for visiting The Penturners Forum today.

    There are many features and resources that currently you are unable to see or access, either because you're not yet registered, or if you're already registered, because you're not logged in.

    To gain full access to the forum, please log in or register now. Registration is completely free, it only takes a few seconds, and you can join our well established community of like-minded pen makers.

First attempt at Kitless

Burt25

Full Member
Joined
Apr 29, 2016
Posts
147
Location
N Ireland
First Name
Ian
Ian I like your work on this pen, there is nothing wright or wrong with a kit pen or so called kitless like yours. They both serve their purpose. You will find it another ball game if you like beautiful timber. Triple start does seem a way to go few users would put up with 9 turns to remove and restore the cap.

Congratulations on your first of this making for you I see a great pen.

Peter.

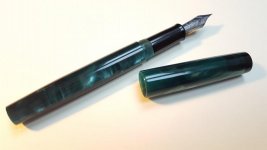
Thanks Peter, I ultimately want to produce a timber kitless (with acrylic section and acrylic threaded inserts) but one step at a time!
 

fortress

Registered
Joined
Apr 11, 2016
Posts
5,178
Location
Astley
First Name
John
And so you should be pleased Ian, that's a really great first attempt, if the cap fits....wear it. :thumbs::thumbs:
 

silver

General dogsbody
Executive Member
Joined
Jun 29, 2013
Posts
6,304
Location
Somewhere in Staffordshire,
First Name
Eamonn.
Excellent first go there Ian.

One way to reduce how many turns to remove the cap is having a shorted threaded section.

If it was half the length it is now then you should take only 4.5 turns, if that makes sense..

Some good advice with threading as well:thumbs:

The only other thing I would do is have a thinner parting tool to make a smaller recess behind the threaded section, it also looks as though it's not quite square so wonder if it's that that the cap threads butting up against.
 

Burt25

Full Member
Joined
Apr 29, 2016
Posts
147
Location
N Ireland
First Name
Ian
Excellent first go there Ian.

One way to reduce how many turns to remove the cap is having a shorted threaded section.

If it was half the length it is now then you should take only 4.5 turns, if that makes sense..

Some good advice with threading as well:thumbs:

The only other thing I would do is have a thinner parting tool to make a smaller recess behind the threaded section, it also looks as though it's not quite square so wonder if it's that that the cap threads butting up against.

Thanks Eamon, Was thinking about where to get a thinner parting tool and was wondering about filing down a reciprocating saw blade?
 

Pierre---

Full Member
Joined
Feb 3, 2016
Posts
231
Location
France
First Name
Pierre
An excellent beginning Ian!

9 turns, if you use a triple start, will still make 3 turns. Twice too much... You can make the threads shorter, and/or add a ring instead of turning away some material. A black ring would be classy on your pen. Not too late! The step between threads and barrel could be higher though.

It is anyway useful to have a thin (say 1 mm) parting tool. You can use a HSS drill bit glued in a handle and grind it. Easier than ordering a new one and waiting...

Waiting to see the cap!
 

Burt25

Full Member
Joined
Apr 29, 2016
Posts
147
Location
N Ireland
First Name
Ian
An excellent beginning Ian!

9 turns, if you use a triple start, will still make 3 turns. Twice too much... You can make the threads shorter, and/or add a ring instead of turning away some material. A black ring would be classy on your pen. Not too late! The step between threads and barrel could be higher though.

It is anyway useful to have a thin (say 1 mm) parting tool. You can use a HSS drill bit glued in a handle and grind it. Easier than ordering a new one and waiting...

Waiting to see the cap!

Thank you for your help and advice Pierre. Wondering how I could get a band on at this stage? I assume I would need to part off the threaded part and sleeve on the ebonite. Other option is to take 2mm off length of thread (will need to check I have a deep enough hole drilled for the converter)
 

silver

General dogsbody
Executive Member
Joined
Jun 29, 2013
Posts
6,304
Location
Somewhere in Staffordshire,
First Name
Eamonn.
Thanks Eamon, Was thinking about where to get a thinner parting tool and was wondering about filing down a reciprocating saw blade?

Yep, saw blade would work well, but I would use the bench grinder rather than a file. Good option as it's much cheaper than buying.

As Pierre quoted, any tool steel should work well.

I have an old wood chisel that has been ground and sharpened to suit what I need.
 

Burt25

Full Member
Joined
Apr 29, 2016
Posts
147
Location
N Ireland
First Name
Ian
Ive found one slight problem which is that the 1/4" hole in the back of the section to seat the converter is just a little too neat - the converter goes in but its tight and when I pop it back out it leaves the metal sleeve of the converter behind! - I figure I need to open this hole by only a hairs breadth, but how do I how that without potentially leaving it loose?
 

Buckeye

ペンメーカー
Executive Member
Joined
Oct 15, 2013
Posts
9,697
Location
UK
First Name
Peter
Ive found one slight problem which is that the 1/4" hole in the back of the section to seat the converter is just a little too neat - the converter goes in but its tight and when I pop it back out it leaves the metal sleeve of the converter behind! - I figure I need to open this hole by only a hairs breadth, but how do I how that without potentially leaving it loose?

If I understand the problem correctly then you would be better to make the hole bigger, the convertor fits to the back of the nib and the metal part of the convertor doesn't need to touch anything.

Peter
 

Burt25

Full Member
Joined
Apr 29, 2016
Posts
147
Location
N Ireland
First Name
Ian
If I understand the problem correctly then you would be better to make the hole bigger, the convertor fits to the back of the nib and the metal part of the convertor doesn't need to touch anything.

Peter

I thought the converter had to be a snug fit into the section to prevent leaks? If I pop the converter on to the back of the nib housing it's a loose fit- will that not mean leaks?
 

Pierre---

Full Member
Joined
Feb 3, 2016
Posts
231
Location
France
First Name
Pierre
For the ring, you can try to cut a piece of ebonite the width you need, drill or turn the smaller hole to go over the threads, glue it, make it flush and polish it .
About the converter, the snug fit is at the very end. The metal part only guides the converter, keeping it straight: the fit is not really snug, just not loose in my opinion. So you may first glue the metal part to the plastic for it should not be taken apart - or change the converter. If you want to make the hole a hair bigger (I mean a hair, hmm?), sand the interior with a roll of heavy sandpaper, or with this useful device whose name I don't know, we call it a fly in French:
bfinimouche01.jpg
 

Phil Dart

Moderator
Executive Member
Joined
Nov 28, 2014
Posts
5,458
Location
Colebrooke, Devon
First Name
Phil
I thought the converter had to be a snug fit into the section to prevent leaks? If I pop the converter on to the back of the nib housing it's a loose fit- will that not mean leaks?

Standard International converters and cartridges are less standard than you might imagine. It's a name and a principle more than a strictly adhered to set of standards. Whip the converter out of one of your Mistrals Ian, and you will find it is an excellent fit onto the intake of a Bock housing. Some of the far eastern housings are a bit sloppy.

The ideal situation would be that you have clearance around the metal collar of the converter, but a tight fit onto the intake of the housing. The section needs to shroud the collar, whilst not touching it, so as to afford a little bit of protection from lateral movement in the event that the converter gets knocked in the process of refilling it.
 

GSteer

Registered
Joined
Apr 9, 2015
Posts
362
Location
Soaked Cumbria, UK
First Name
Greg
As Phil mentioned, the seal is between the nipple from the feed and the mouth of the converter, which prevents leaks from the feed/converter join. The only place a fountain pen should leak from is the front of the nib, which is a permanent controlled leak after all ;)
 

Burt25

Full Member
Joined
Apr 29, 2016
Posts
147
Location
N Ireland
First Name
Ian
Standard International converters and cartridges are less standard than you might imagine. It's a name and a principle more than a strictly adhered to set of standards. Whip the converter out of one of your Mistrals Ian, and you will find it is an excellent fit onto the intake of a Bock housing. Some of the far eastern housings are a bit sloppy.

The ideal situation would be that you have clearance around the metal collar of the converter, but a tight fit onto the intake of the housing. The section needs to shroud the collar, whilst not touching it, so as to afford a little bit of protection from lateral movement in the event that the converter gets knocked in the process of refilling it.

Phil,
The converter is a tight fit in the Bock nib housing (kit version), but it is a loose fit in the #6 Bock standard housing. Thats why I was wondering if the seal should be made with the section? If you pop a converter into the Bock Kit housing #5 and then into #6 Bock Standard you will hopefully see what I mean :thinks:
 

fingwe

Registered
Joined
Nov 2, 2015
Posts
322
Location
Suffolk
First Name
Melanie
This thread is making very interesting reading. I've had a go with a #5 Bock Standard housing, and the ink converter fits nicely in it. I've also drilled the 1/4 inch hole in the section for the converter to sit in, and whilst it's a snug fit, it doesn't sound as tight as yours. I haven't got much further than that, as the die I was trying to use to make the cap thread on the barrel was defective, and though I've got another one now, other things have taken priority. :rolling:
 

Pierre---

Full Member
Joined
Feb 3, 2016
Posts
231
Location
France
First Name
Pierre
With a kit housing, use a no-name converter that goes with kits. For Bock standard housing, use Schmidt or Beaufort. Diameters are not the same.
 

Burt25

Full Member
Joined
Apr 29, 2016
Posts
147
Location
N Ireland
First Name
Ian
With a kit housing, use a no-name converter that goes with kits. For Bock standard housing, use Schmidt or Beaufort. Diameters are not the same.

Hi Pierre

The Beaufort goes perfectly into the kit housing but to me it seems a tad loose in the Bock housing? Perhaps that's how it should be?
 

Burt25

Full Member
Joined
Apr 29, 2016
Posts
147
Location
N Ireland
First Name
Ian
Cap finished - will leave this one without a clip.
 

Attachments

  • 1.jpg
    1.jpg
    18.9 KB · Views: 23
  • 2.jpg
    2.jpg
    22.1 KB · Views: 24
Warning! This thread has not had any replies for over a year. You are welcome to post a reply here, but it might be better to start a new thread (and maybe include a link to this one if you need to).
Top